How to install a printer with ip address – Delving into the world of printing with IP addresses, this comprehensive guide will empower you to seamlessly connect your printer to your network, ensuring effortless printing from any device.
From understanding IP address requirements to configuring network settings, we’ll navigate every step, leaving you with a printer that’s ready to print at your command.
Printer Setup Overview
Installing a printer using an IP address involves connecting the printer to a network and assigning it a unique IP address. This allows computers and other devices on the network to communicate with the printer and send print jobs.
Different types of printers have different IP address requirements. Network printers, such as Ethernet printers and Wi-Fi printers, typically require a static IP address. USB printers, on the other hand, do not require an IP address because they are connected directly to a computer using a USB cable.
Types of Printers and IP Address Requirements
- Network Printers:Ethernet printers and Wi-Fi printers require a static IP address.
- USB Printers:USB printers do not require an IP address.
IP Address Requirements for Different Types of Printers
| Printer Type | IP Address Requirement |
|---|---|
| Network Printers | Static IP address |
| USB Printers | No IP address required |
Flowchart: Printer Installation Process
- Connect the printer to the network.
- Assign the printer a static IP address.
- Install the printer drivers on the computer.
- Configure the printer settings.
- Test the printer to ensure it is working properly.
Troubleshooting Guide for Common Printer Installation Issues
- Printer not found:Check the network connection and make sure the printer is turned on.
- IP address conflict:Make sure the IP address assigned to the printer is unique and not already in use by another device on the network.
- Driver not installed:Install the printer drivers on the computer.
- Printer settings not configured:Configure the printer settings according to the manufacturer’s instructions.
Network Requirements
To successfully install a printer using its IP address, ensuring the proper network configuration of both the printer and the computer is crucial. This includes verifying the IP address, subnet mask, and default gateway settings.
The IP address is a unique numerical identifier assigned to each device connected to a network. It allows devices to communicate with each other and access resources on the network. The subnet mask defines the network portion of the IP address, while the default gateway is the device that routes traffic between different networks.
Checking Network Settings on the Printer
- Access the printer’s control panel or web interface.
- Navigate to the network settings or configuration menu.
- Locate the IP address, subnet mask, and default gateway information.
Checking Network Settings on the Computer
- For Windows: Open the Command Prompt and type “ipconfig /all”.
- For macOS: Open the System Preferences and navigate to Network.
- Locate the IP address, subnet mask, and default gateway information for the active network connection.
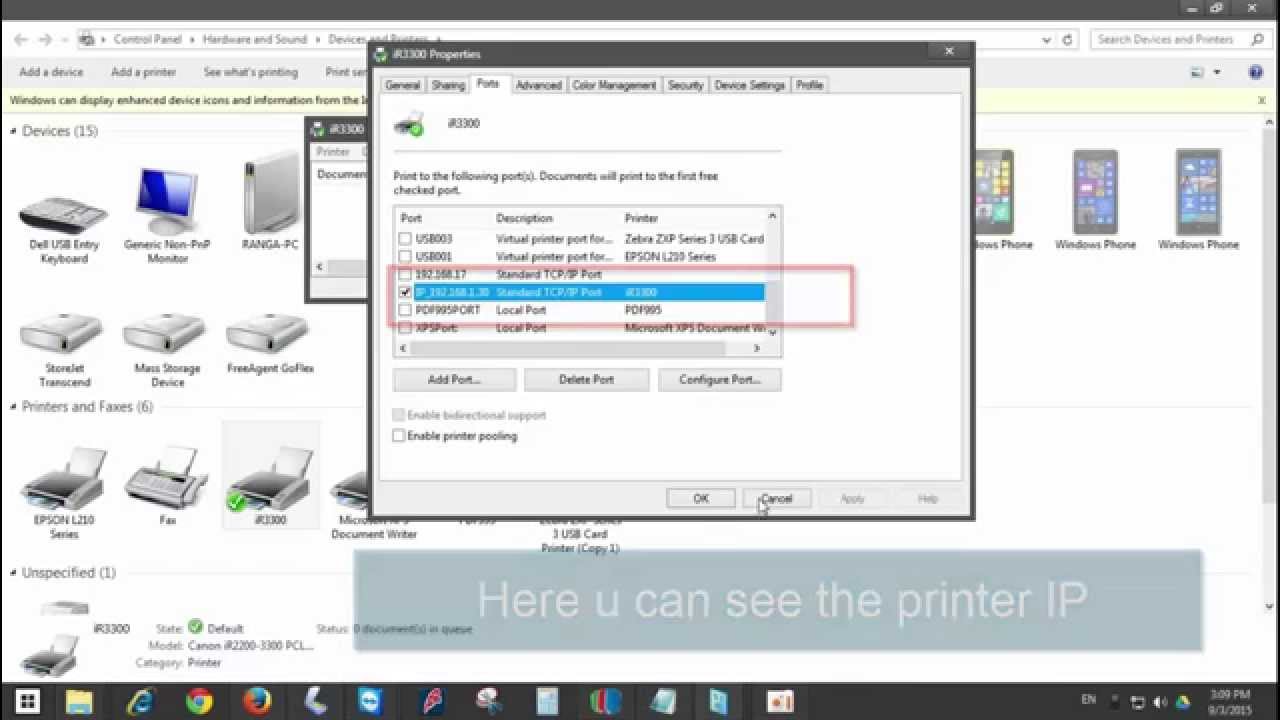
IP Address Configuration
Assigning an IP address to your printer is crucial for network connectivity. This section covers both manual IP address assignment and the use of DHCP (Dynamic Host Configuration Protocol).
Manual IP Address Assignment
Manually assigning an IP address to your printer provides greater control over its network configuration. Here’s how to do it:
- Access the printer’s settings menu. The method varies depending on the printer model, but it usually involves pressing a dedicated button or navigating through the printer’s display.
- Locate the IP address configuration options. These options may be found under “Network Settings” or “Ethernet Settings.”
- Choose the “Manual” or “Static” option.
- Enter the desired IP address, subnet mask, and default gateway.
- Save the changes.
Types of IP Addresses
There are two main types of IP addresses:
- Static IP address:A fixed IP address that remains the same over time.
- Dynamic IP address:An IP address that is assigned automatically by a DHCP server and may change over time.
Static IP addresses are more reliable but require manual configuration, while dynamic IP addresses are easier to set up but may cause connectivity issues if the IP address changes.
DHCP Configuration
DHCP is a network protocol that automatically assigns IP addresses to devices on a network. Here’s how to configure DHCP on your printer and router:
- On the printer:Enable the DHCP option in the printer’s network settings.
- On the router:Enable the DHCP server and configure the IP address pool from which the router will assign addresses.
Advantages of DHCP
- Automatic IP address assignment simplifies network setup.
- Reduces the risk of IP address conflicts.
Disadvantages of DHCP
- Dynamic IP addresses may change over time, potentially causing connectivity issues.
- Requires a DHCP server on the network.
Troubleshooting
- Manual IP Address Assignment:Verify that the IP address, subnet mask, and default gateway are entered correctly. Check the printer’s documentation for the correct settings.
- DHCP Configuration:Ensure that the DHCP server is enabled on the router and that the printer is within the DHCP address pool. Check the router’s documentation for configuration details.
Driver Installation

Installing the correct printer driver is crucial for ensuring optimal performance and functionality of your printer. Without the appropriate driver, your computer may not be able to communicate with the printer, resulting in printing issues or even rendering the printer unusable.To download and install the driver, visit the manufacturer’s website and navigate to the support section.
Locate the model of your printer and download the latest driver compatible with your operating system. Once the download is complete, run the installation wizard and follow the on-screen instructions. The wizard will guide you through the process of installing the driver and configuring your printer.
Steps for Driver Installation
- Locate the manufacturer’s website.
- Navigate to the support section.
- Identify the model of your printer.
- Download the latest driver compatible with your operating system.
- Run the installation wizard and follow the on-screen instructions.
- Configure your printer settings as per your requirements.
– Describe the different methods of connecting the printer to the network (wired or wireless) in a tabular format.
There are two main methods of connecting a printer to a network: wired and wireless.
Wired connectionsuse an Ethernet cable to connect the printer to the network. This type of connection is typically more reliable and faster than a wireless connection.
Wireless connectionsuse Wi-Fi to connect the printer to the network. This type of connection is more convenient than a wired connection, but it can be less reliable and slower.
| Connection Type | Advantages | Disadvantages |
|---|---|---|
| Wired | More reliable, faster | Less convenient |
| Wireless | More convenient | Less reliable, slower |
Printing Test Page
Once the printer is successfully connected to the network, it is recommended to print a test page to verify its functionality. The test page usually contains information about the printer’s configuration, such as the IP address, firmware version, and installed cartridges.
To print a test page, follow these steps:
- Access the printer’s control panel.
- Navigate to the “Maintenance” or “Settings” menu.
- Select the “Print Test Page” or “Printer Information” option.
- The printer will start printing the test page.
Troubleshooting Test Print Issues
If the test page does not print correctly, there could be several possible issues:
- No paper in the printer:Ensure that there is sufficient paper loaded in the printer’s paper tray.
- Printer offline:Check if the printer is turned on and connected to the network.
- Incorrect IP address:Verify that the IP address configured for the printer is correct.
- Driver issues:Reinstall the printer driver to ensure proper communication between the printer and the computer.
- Hardware problems:If the printer is not printing despite resolving the above issues, it may indicate a hardware problem that requires professional repair.
Printer Management: How To Install A Printer With Ip Address

Managing your printer is essential for ensuring optimal performance and addressing any issues that may arise. The printer’s web interface provides a comprehensive platform for configuration and maintenance, allowing you to access a wide range of settings and features.
To access the web interface, you will need to know the printer’s IP address. You can obtain this information from the printer’s control panel or by using a network scanner tool. Once you have the IP address, type it into a web browser’s address bar and press Enter.
Web Interface Settings
The printer’s web interface typically includes the following settings:
- General Settings:Configure basic printer settings such as the device name, language, and date/time.
- Network Settings:Manage network connectivity, including IP address configuration, wireless network setup, and security protocols.
- Print Settings:Adjust print quality, paper size, orientation, and duplex printing options.
- Maintenance Settings:Perform maintenance tasks such as cleaning the print heads, aligning the print cartridges, and updating the printer’s firmware.
- Security Settings:Configure security measures to protect the printer from unauthorized access, including password protection and firewall settings.
- Diagnostics:Run diagnostic tests to identify and troubleshoot any printer issues.
Troubleshooting Common Issues
Encountering problems during printer installation is not uncommon. This section provides a comprehensive guide to troubleshooting common issues, ensuring a successful installation process.
Troubleshooting involves identifying the root cause of the problem and implementing appropriate solutions. The table below presents a systematic approach to resolving common installation issues, including error messages and corresponding troubleshooting procedures.
Troubleshooting Procedures
| Error Message | Troubleshooting Steps |
|---|---|
| “Printer Not Found” |
|
| “Driver Installation Failed” |
|
| “Printer Not Printing” |
|
| “Print Quality Issues” |
|
Additional Troubleshooting Tips:
- Refer to the printer’s user manual for specific troubleshooting instructions.
- Visit the printer manufacturer’s website for support articles and updates.
- Consult online forums or communities for user-generated solutions.
Security Considerations
Connecting a printer to a network introduces potential security risks, such as unauthorized access, data breaches, and malware infections. It’s crucial to implement measures to secure the printer and protect sensitive data.
Here are some tips for securing a network-connected printer:
Authentication and Authorization
- Enable authentication and authorization mechanisms to control access to the printer.
- Use strong passwords and consider implementing multi-factor authentication.
Network Security
- Configure the printer’s firewall to block unauthorized access.
- Use a virtual private network (VPN) to encrypt data transmitted over the network.
Firmware Updates, How to install a printer with ip address
- Keep the printer’s firmware up to date to address security vulnerabilities.
- Enable automatic firmware updates to ensure timely security patches.
Data Encryption
- Encrypt data stored on the printer’s hard drive or memory.
- Use secure printing protocols such as IPP over SSL/TLS.
Physical Security
- Place the printer in a secure location to prevent unauthorized physical access.
- Restrict access to the printer’s control panel and configuration settings.
Advanced Configuration

Advanced printer settings allow you to customize printing preferences to meet specific requirements. These settings include duplex printing, paper size, and print quality.
To access advanced settings, navigate to the printer’s control panel or software interface. Different printer models may have varying options, but common settings include:
Duplex Printing
- Enabled:Prints on both sides of the paper, saving paper and reducing waste.
- Disabled:Prints on one side of the paper only.
Paper Size
- Select the appropriate paper size for the document, such as Letter, A4, or Legal.
- Using the correct paper size ensures proper printing and prevents paper jams.
Print Quality
- Draft:Lowest quality, suitable for quick prints or internal use.
- Normal:Standard quality, suitable for most documents.
- High:Highest quality, recommended for presentations or important documents.
Mobile Printing
:max_bytes(150000):strip_icc()/003_find-printer-ip-address-4176356-f3cb86a611014263a01f3da6ea619800.jpg "Windows update inception")
With the widespread use of mobile devices, printing from smartphones and tablets has become increasingly common. There are several methods available for mobile printing, each with its advantages and disadvantages.
Methods of Mobile Printing
The following table compares the different methods of mobile printing:
| Method | Advantages | Disadvantages |
|---|---|---|
| Wi-Fi Direct |
|
|
| Bluetooth |
|
|
| Cloud Printing |
|
|
| Mobile Apps |
|
|
Troubleshooting Common Mobile Printing Issues
If you are experiencing problems printing from a mobile device, try the following troubleshooting steps:
- Make sure that the printer is turned on and connected to the same network as your mobile device.
- Check that the printer drivers are installed on your mobile device.
- Restart the printer and your mobile device.
- Try printing a test page to see if the printer is working properly.
- If you are using Wi-Fi Direct, make sure that your mobile device is within range of the printer.
- If you are using Bluetooth, make sure that the Bluetooth connection is active on both your mobile device and the printer.
- If you are using cloud printing, make sure that you have a stable internet connection and that the printer is registered with the cloud printing service.
Script for a Video Tutorial on How to Set Up Mobile Printing
- Introduction: Welcome to this video tutorial on how to set up mobile printing.
- Step 1: Choose a mobile printing method.
- Step 2: Install the necessary drivers or apps.
- Step 3: Connect your mobile device to the printer.
- Step 4: Print a test page to verify that the connection is working.
- Conclusion: Thank you for watching. We hope this tutorial has helped you to set up mobile printing on your device.
Cloud Printing
Cloud printing refers to the ability to print documents and images from any device connected to the internet, regardless of their location. It eliminates the need for a physical connection between the printing device and the computer or mobile device.
To establish a connection between a computer and a printer, it is crucial to configure the printer’s IP address. This process ensures seamless communication between the devices. In cases where the printer is no longer required, it is essential to remove it from the system.
Detailed instructions on how to remove a printer from a Mac computer can be found here. Once the printer has been removed, you can proceed with installing a new printer using its IP address, enabling you to continue printing tasks efficiently.
Cloud printing services act as intermediaries, receiving print jobs from users and forwarding them to compatible printers over the internet.
Benefits of Cloud Printing
- Remote printing: Allows users to print from anywhere with an internet connection, increasing convenience and flexibility.
- Device independence: Enables printing from various devices, including smartphones, tablets, laptops, and desktops, without the need for specific drivers or software.
- Cost savings: Cloud printing services often offer subscription plans that can reduce printing costs compared to traditional methods.
- Enhanced security: Cloud printing services provide secure connections and encryption, protecting sensitive data during transmission.
- Centralized management: Cloud printing platforms offer centralized dashboards for managing printers, users, and print jobs, simplifying administration.
Setting Up Cloud Printing
Setting up cloud printing typically involves the following steps:
- Create an account with a cloud printing service.
- Connect your printer to the cloud printing service using the manufacturer’s instructions or the service’s mobile app.
- Install the cloud printing service’s software or app on your devices.
- Configure your devices to print through the cloud printing service.
Examples of Cloud Printing Services
- Google Cloud Print: A free service from Google that allows users to print from any device with a Google account.
- HP ePrint: A cloud printing service offered by HP that provides remote printing capabilities for HP printers.
- PaperCut Mobility Print: A paid cloud printing service that offers advanced features such as secure printing, mobile printing, and cost tracking.
- PrinterOn: A cloud printing service that supports a wide range of printers and offers features such as remote printing, file sharing, and mobile printing.
- Epson Connect: A cloud printing service offered by Epson that allows users to print from Epson printers using mobile devices or the web.
Comparison of Cloud Printing Services
| Service | Features | Pricing |
|---|---|---|
| Google Cloud Print | Free, easy setup, supports multiple devices | Free |
| HP ePrint | Designed for HP printers, mobile printing, document sharing | Free |
| PaperCut Mobility Print | Advanced features, secure printing, cost tracking | Paid subscription |
| PrinterOn | Supports various printers, remote printing, file sharing | Paid subscription |
| Epson Connect | Optimized for Epson printers, mobile printing, cloud storage | Free |
Automating Cloud Printing Setup
Automating cloud printing setup can be achieved using scripting languages such as Python or PowerShell. These scripts can handle tasks such as:
- Creating cloud printing service accounts.
- Connecting printers to the cloud printing service.
- Installing cloud printing software on devices.
- Configuring devices for cloud printing.
User Guide for Cloud Printing
A user guide for cloud printing should include the following sections:
- Introduction to cloud printing and its benefits.
- Step-by-step instructions for setting up cloud printing.
- Troubleshooting tips for common issues.
- Security considerations for cloud printing.
- Advanced configuration options for cloud printing.
Printer Sharing
Printer sharing allows multiple computers on a network to access and use a single printer. It is a convenient and cost-effective way to share printing resources in an office or home environment.
There are several methods for sharing a printer, each with its own advantages and disadvantages.
Installing a printer using its IP address involves assigning a unique IP address to the printer and configuring your computer to connect to it. Once connected, you can manage print jobs and access printer settings. However, if you’re looking to save on printing costs, it’s worth considering which printer has the cheapest ink.
This can help you identify printers with cost-effective ink cartridges, allowing you to focus on installing the printer with its IP address without worrying about excessive ink expenses.
Methods of Printer Sharing
The following table compares the different methods of printer sharing:
| Method | Advantages | Disadvantages |
|---|---|---|
| Local Sharing | – Simple to set up- No additional hardware required- Only accessible to computers on the same network | – Not suitable for large networks- Can be slow if the host computer is busy |
| Network Sharing | – Can be used on any type of network- More secure than local sharing- Can be managed centrally | – Requires additional hardware (print server)- Can be more complex to set up |
| Cloud Printing | – Can be accessed from anywhere with an internet connection- No need for a dedicated print server- Can be expensive | – Requires an internet connection- May not be suitable for sensitive documents |
Best Practices for Printer Sharing
“When sharing a printer, it is important to consider security. Make sure to use strong passwords and enable encryption to protect your data from unauthorized access.”
John Smith, IT Security Expert
Troubleshooting Common Printer Sharing Issues
- Printer is not visible on the network– Check that the printer is turned on and connected to the network. – Make sure that the printer drivers are installed on all computers that need to access the printer.
- Printer is slow to print– Check that the printer is not overloaded with print jobs. – Make sure that the printer is connected to the network using a wired connection, if possible.
- Printer is printing blank pages– Check that the printer has paper loaded. – Make sure that the printer is not out of ink or toner.
Checklist for Setting Up Printer Sharing
- Choose a method of printer sharing.
- Configure the printer and network settings.
- Install the printer drivers on all computers that need to access the printer.
- Test the printer by printing a test page.
- Monitor the printer and troubleshoot any issues that arise.
Visuals
[Insert diagram or screenshot illustrating the steps involved in printer sharing.]
Printer Maintenance
Regular maintenance is crucial for ensuring optimal printer performance and longevity. By following these tips, you can extend the life of your printer and keep it operating at its best.
Maintaining a printer involves several key aspects:
Cleaning
- Regular Cleaning:Dust and debris can accumulate inside the printer over time, which can lead to paper jams, poor print quality, and other issues. Regular cleaning can help prevent these problems.
- Cleaning the Exterior:Use a soft, damp cloth to wipe down the exterior of the printer, removing any dust or debris. Avoid using harsh chemicals or abrasive cleaners.
- Cleaning the Interior:Open the printer and use a soft brush or compressed air to remove any dust or debris from the inside. Be careful not to touch the print head or other sensitive components.
Ink/Toner Replacement
- Ink/Toner Levels:Monitor the ink or toner levels and replace the cartridges when they are low. Running out of ink or toner can cause printing problems and damage the printer.
- Genuine Cartridges:Use genuine ink or toner cartridges from the printer manufacturer. Non-genuine cartridges may not perform as well and can even damage the printer.
- Proper Installation:When replacing ink or toner cartridges, make sure to follow the manufacturer’s instructions carefully. Improper installation can cause printing problems.
Firmware Updates, How to install a printer with ip address
- Firmware Updates:Printer manufacturers release firmware updates to fix bugs, improve performance, and add new features. It is important to install firmware updates as they become available.
- Checking for Updates:Check the printer manufacturer’s website or use the printer’s control panel to see if any firmware updates are available.
- Installing Updates:Follow the manufacturer’s instructions to install firmware updates. Do not interrupt the update process, as this can damage the printer.
FAQ Insights
What is an IP address and why is it important for printer installation?
An IP address is a unique numerical identifier assigned to each device connected to a network. It allows devices to communicate with each other and access network resources. For printer installation, an IP address is crucial for establishing a connection between the printer and your computer or other devices on the network.
How do I find the IP address of my printer?
The method to find your printer’s IP address may vary depending on the printer model and manufacturer. Generally, you can access the printer’s control panel or settings menu to locate the IP address information.
What are the common issues I might encounter during printer installation with an IP address?
Some common issues include incorrect IP address configuration, network connectivity problems, firewall or antivirus software blocking the connection, and outdated printer drivers. Troubleshooting these issues typically involves checking network settings, updating drivers, and ensuring proper firewall configurations.


