How to clear the print area in excel – Mastering the art of clearing the print area in Excel is a crucial skill for optimizing your printing efficiency. Whether you’re a seasoned spreadsheet user or just starting out, this guide will equip you with the knowledge and techniques to effortlessly manage your print settings and achieve flawless printouts.
This comprehensive guide covers everything you need to know about clearing the print area in Excel, from understanding the basics to customizing advanced settings. With clear instructions, real-world examples, and troubleshooting tips, you’ll become an expert in controlling what gets printed and how it appears on paper.
Understanding the Print Area

The print area in Excel refers to the specific range of cells or data that you want to print. It allows you to control what portion of your spreadsheet is included in the printed output.
If you’re having trouble clearing the print area in Excel, there may be a problem with your printer. Try unpausing the printer to see if that resolves the issue. Once the printer is unpaused, you can try clearing the print area again in Excel.
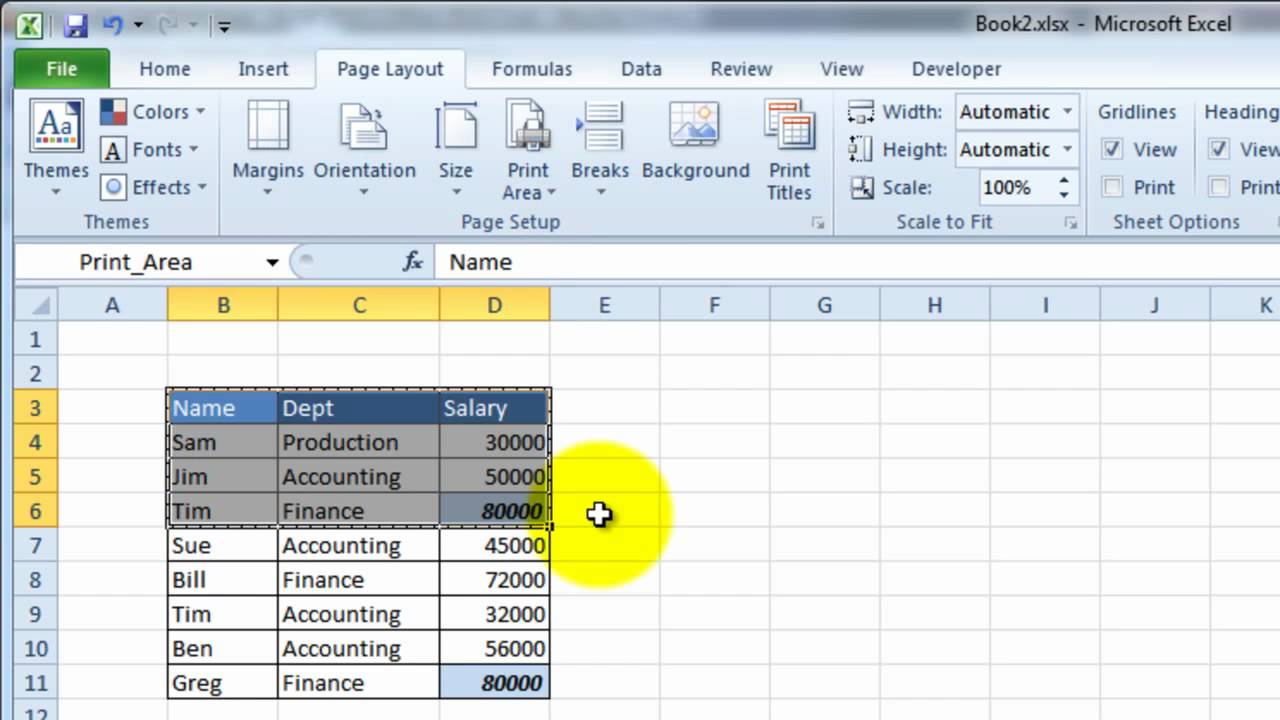
To select a print area, simply highlight the cells or range you want to print. You can also use the “Set Print Area” option in the Page Setup group on the Page Layout tab.
Different Ways to Set the Print Area
- Manually:Highlight the desired range of cells.
- Using the “Set Print Area” option:Go to Page Layout > Page Setup > Set Print Area.
- Using VBA (Visual Basic for Applications):You can use VBA code to programmatically set the print area.
Once the print area is set, you can print only the selected range by going to File > Print or using the keyboard shortcut Ctrl + P.
Clearing the Print Area

The print area in Excel defines the specific range of cells that will be printed. Clearing the print area removes the defined range, allowing you to print the entire worksheet or a new range.
Using the Page Setup Dialog Box
To clear the print area using the Page Setup dialog box:
- Go to the “Page Layout” tab.
- In the “Page Setup” group, click the “Print Area” drop-down menu.
- Select “Clear Print Area” from the menu.
Using Keyboard Shortcuts
You can also clear the print area using the following keyboard shortcuts:
- Windows: Ctrl + Shift + F9
- Mac: Cmd + Shift + F9
Purpose of the “Clear All” Button
The “Clear All” button in the Page Setup dialog box removes all print settings, including the print area, margins, and orientation. This is useful if you want to reset all print settings to their default values.
Summary Table
The following table summarizes the steps to clear the print area using both the dialog box and keyboard shortcuts:
| Method | Steps |
|---|---|
| Dialog Box |
|
| Keyboard Shortcuts |
|
Clearing the Print Area Programmatically
You can also clear the print area programmatically using the following VBA code:
ActiveSheet.PageSetup.PrintArea = ""
Customizing the Print Area
Customizing the print area allows you to specify a specific range of cells to be printed, excluding any unnecessary or confidential data.
To set a custom print area:
- Select the cells you want to print.
- Go to the “Page Layout” tab in the Excel ribbon.
- In the “Page Setup” group, click the “Print Area” drop-down menu.
- Select “Set Print Area”.
You can also adjust the margins of the print area to optimize the layout and save paper.
Margins
To adjust the print area margins:
- Go to the “Page Layout” tab in the Excel ribbon.
- In the “Page Setup” group, click the “Margins” drop-down menu.
- Select the desired margin settings.
Printing Specific Rows and Columns
:max_bytes(150000):strip_icc()/ExcelPageBreakPreview-5c1c28c8c9e77c00017a2ade.jpg)
To print specific rows and columns in Excel, follow these steps:
- Select the rows and columns you want to print.
- Click the “Page Layout” tab.
- In the “Page Setup” group, click the “Print Area” drop-down arrow.
- Select “Set Print Area”.
- The selected rows and columns will now be set as the print area.
You can also use the “Print Selection” option to print only the selected cells.
Printing Using the “Print Selection” Option
To print using the “Print Selection” option:
- Select the cells you want to print.
- Click the “File” tab.
- Click “Print”.
- In the “Print” dialog box, select the “Print Selection” option.
- Click “OK” to print the selected cells.
Printing Hidden Rows and Columns
Printing hidden rows and columns in Excel allows you to include data that is not visible on the screen in your printed output. This can be useful for printing confidential information or for creating a more concise printout.To print hidden rows and columns, you must first unhide them.
To do this, select the rows or columns that you want to unhide and then click on the “Format” menu. Select “Unhide” from the menu and the rows or columns will be unhidden.Once the rows or columns are unhidden, you can print them as usual.
To print the entire worksheet, click on the “File” menu and select “Print”. In the “Print” dialog box, make sure that the “Print hidden rows and columns” checkbox is selected. Click on the “OK” button to print the worksheet.
Printing Multiple Sheets

Printing multiple sheets in Excel allows you to combine multiple worksheets into a single print job. This can be useful when you need to print related data from different sheets or create a comprehensive document.
To print multiple sheets, follow these steps:
Selecting Sheets to Print
- Open the Excel workbook containing the sheets you want to print.
- Click on the “Sheet” tab at the bottom of the Excel window.
- Hold down the “Ctrl” key and click on the tabs of each sheet you want to print.
Printing in Order or Non-Order, How to clear the print area in excel
Once you have selected the sheets to print, you can choose whether to print them in order or non-order:
- Print in order:The sheets will be printed in the order they appear in the workbook.
- Print in non-order:The sheets will be printed in the order you selected them.
To print the sheets in non-order, hold down the “Shift” key while selecting the sheet tabs.
Page Breaks and Scaling
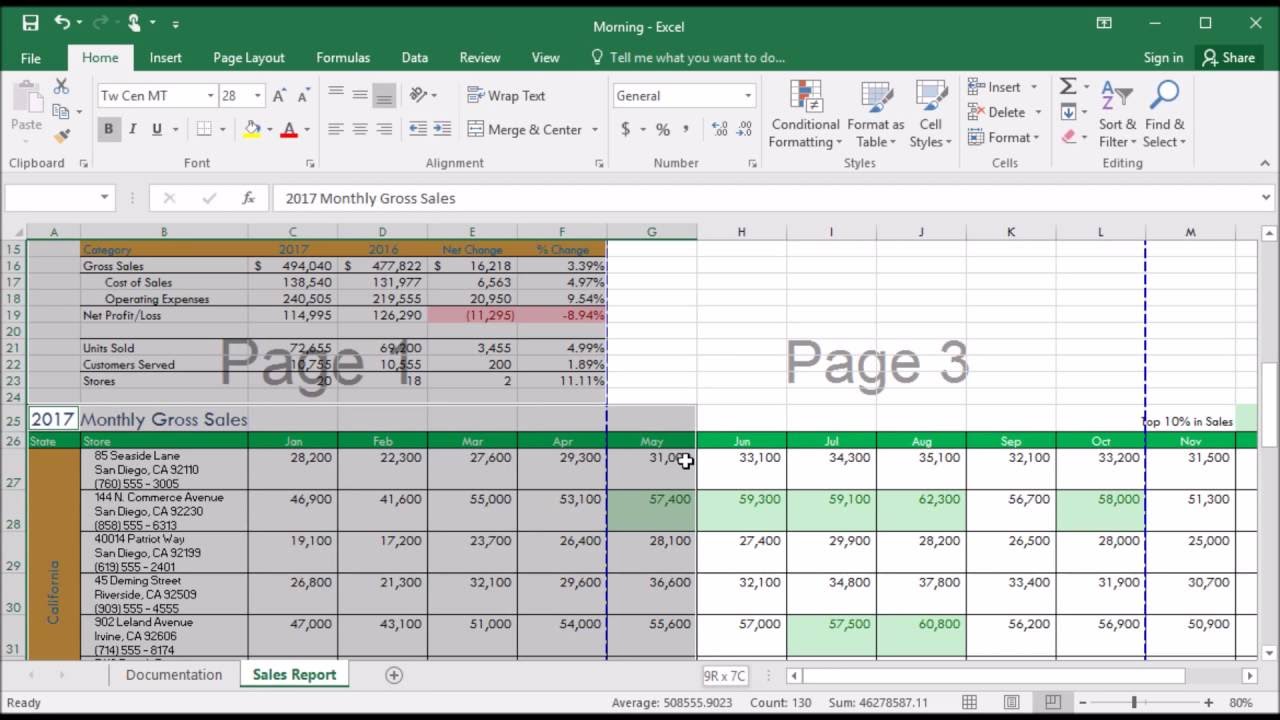
Page breaks and scaling are essential tools for controlling the layout and appearance of printed documents in Excel. Page breaks allow you to specify where the printed output should be divided into separate pages, while scaling enables you to adjust the size of the printed area to fit on a single page or to emphasize specific sections of the data.
To insert a page break, select the row or column where you want the break to occur and go to the “Page Layout” tab. In the “Page Setup” group, click on the “Breaks” button and select “Insert Page Break.” You can also use the keyboard shortcut Ctrl+Enter (Windows) or Command+Enter (Mac) to insert a page break.
Scaling the print area allows you to adjust the size of the printed output to fit on a single page or to emphasize specific sections of the data. To scale the print area, go to the “Page Layout” tab and click on the “Scale to Fit” button in the “Page Setup” group.
You can choose to scale the print area to fit on one page wide or one page tall, or you can specify a custom scaling percentage.
Page breaks and scaling can be used in a variety of applications, such as:
- Controlling the layout of large spreadsheets that span multiple pages
- Printing specific sections of a spreadsheet on separate pages
- Enlarging or reducing the size of the printed output to fit on a specific page size
- Emphasizing specific sections of the data by scaling them up or down
Table of Page Break and Scaling Options
| Option | Description |
|---|---|
| Insert Page Break | Inserts a page break at the selected row or column |
| Scale to Fit | Adjusts the size of the printed area to fit on one page wide or one page tall |
| Custom Scaling | Allows you to specify a custom scaling percentage for the printed output |
Code Snippet
// Insert a page break at row 10
worksheet.PageSetup.Breaks.Add Before:=worksheet.Rows(10)

// Scale the print area to fit on one page wide
worksheet.PageSetup.Zoom = True
worksheet.PageSetup.FitToPagesWide = 1
Print Preview
Print Preview is an essential feature in Microsoft Excel that allows you to preview the layout of your document before printing.
It provides a visual representation of how your spreadsheet will appear on paper, enabling you to make adjustments and ensure that the final printed output meets your expectations.
Accessing Print Preview is straightforward. In the File tab, select Print and then click on Print Preview. Alternatively, you can use the keyboard shortcut Ctrl + F2 (Windows) or Cmd + P (Mac).
Once in Print Preview, you will see a preview of your spreadsheet on the left-hand side of the window. The right-hand side provides various options for customizing the print layout, including page orientation, scaling, margins, and headers and footers.
One of the key benefits of using Print Preview is that it allows you to check for errors and make adjustments before printing. You can zoom in and out to inspect specific areas of the spreadsheet, ensuring that all data and formatting are correct.
To clear the print area in Excel, simply click the “Page Layout” tab and then click the “Clear Print Area” button. If you need to print a specific area of your spreadsheet, you can select the cells you want to print and then click the “Set Print Area” button.
For more detailed instructions on how to print a 2×3 photo from your iPhone, click here. Once you have set the print area, you can click the “Print” button to print your spreadsheet.
If you notice any errors or formatting issues, you can return to the spreadsheet and make the necessary changes before printing.
By utilizing Print Preview, you can save time and paper by identifying and resolving any issues before printing. It is a valuable tool that can help you achieve professional-looking printed documents.
Troubleshooting Print Area Issues
Encountering difficulties with print area settings is not uncommon. Here are some common issues and their potential solutions:
Incorrect Print Area Selection
- Issue:The printed output does not match the intended print area.
- Solution:Verify the print area selection in the “Page Setup” dialog box. Ensure that the correct range of cells is specified in the “Print Area” section.
Overlapping Print Areas
- Issue:Multiple print areas are defined, resulting in overlapping content on the printed output.
- Solution:Clear all existing print areas and define a single, non-overlapping print area.
Hidden Print Areas
- Issue:A print area is defined, but it is not visible on the printed output.
- Solution:Check if the print area is hidden due to row or column hiding. Unhide the necessary rows or columns to ensure the print area is visible.
Page Breaks and Scaling
- Issue:The printed output is cut off or scaled incorrectly.
- Solution:Adjust the page breaks and scaling settings in the “Page Setup” dialog box. Experiment with different settings to achieve the desired output.
Printer Settings
- Issue:The printed output does not match the expected size or orientation.
- Solution:Check the printer settings, such as paper size, orientation, and margins. Ensure that they are configured correctly for the desired print area.
Advanced Print Area Techniques
Advanced print area techniques provide enhanced control over the printing process, enabling users to dynamically define print areas, automate print management, and optimize performance. These techniques include using formulas, VBA code, and best practices to address complex printing requirements.
Using Formulas to Define Dynamic Print Areas
Formulas can be used to define dynamic print areas that automatically adjust based on the data in a worksheet. This allows for flexible printing of specific data ranges, such as:
- Printing only the visible cells in a filtered table
- Printing a range of cells that changes based on user input
- Printing a specific number of rows or columns based on a formula calculation
Using VBA Code to Automate Print Area Management
VBA code can be used to automate the management of print areas, providing greater control and efficiency. This includes:
- Setting the print area for multiple worksheets at once
- Creating custom print headers and footers
- Printing specific rows and columns from different worksheets
- Handling errors and exceptions during the printing process
Best Practices for Advanced Print Area Techniques
When using advanced print area techniques, it is important to follow best practices to ensure optimal performance and avoid common problems. These include:
- Use clear and concise formulas to define print areas
- Test formulas thoroughly before using them in a production environment
- Avoid using volatile functions in formulas used for print areas
- Use VBA code sparingly and only when necessary
- Document and maintain VBA code to ensure future usability
Table of Print Area Definition Methods
| Method | Advantages | Disadvantages |
|---|---|---|
| Manual Selection | Simple and straightforward | Not suitable for dynamic print areas or complex requirements |
| Named Ranges | Can be used to define reusable print areas | Limited flexibility and cannot be dynamically updated |
| Formulas | Allows for dynamic print areas based on data | Can be complex to set up and may require advanced Excel skills |
| VBA Code | Provides maximum control and automation | Requires VBA programming skills and can be more complex to implement |
Code Block: Setting Print Area Using VBA
Sub SetPrintArea() Dim ws As Worksheet Set ws = ThisWorkbook.Worksheets("Sheet1") ' Set the print area to cells A1:D10 ws.PageSetup.PrintArea = "$A$1:$D$10" ' Print the worksheet ws.PrintOutEnd Sub
Real-World Example
Advanced print area techniques can be used to solve complex business problems. For example, a company may need to print monthly sales reports that include data from multiple worksheets. Using VBA code, a custom print macro can be created to automatically set the print area for each worksheet, combine the data into a single print range, and generate a consolidated sales report.
Best Practices for Printing
To achieve optimal print quality and resource efficiency, consider these best practices:
To optimize print quality, ensure your printer is properly maintained and calibrated. Use high-quality paper and ink cartridges to produce sharp and vibrant prints. Consider adjusting print settings such as resolution and color mode to suit your specific needs.
Saving Ink and Paper
- Draft Mode:Print in draft mode to reduce ink consumption. This mode uses less ink and produces a lighter print, which is suitable for non-critical documents.
- Grayscale Printing:Convert color documents to grayscale before printing to save ink. Grayscale printing uses only black ink, reducing ink usage significantly.
- Duplex Printing:Print on both sides of the paper to reduce paper consumption. Duplex printing is an eco-friendly option that can save up to 50% on paper usage.
- Preview Before Printing:Always preview your document before printing to avoid wasting paper and ink on unnecessary prints.
Example Table
An example HTML table with 4 responsive columns, filled with data related to print area settings, is provided below. The table includes a header row with labels for each column and is sortable by column. The table is styled with alternating row colors.
The data in the table includes examples of print area settings, such as the print range, the number of copies, and the orientation. The table also includes a column with additional notes about each print area setting.
Table
| Print Range | Number of Copies | Orientation | Additional Notes |
|---|---|---|---|
| A1:Z100 | 1 | Portrait | This is the default print range and number of copies. |
| B2:X99 | 2 | Landscape | This print range includes only the data in the specified range. |
| C3:W98 | 3 | Portrait | This print range includes only the visible data in the specified range. |
| D4:V97 | 4 | Landscape | This print range includes only the selected data in the specified range. |
Popular Questions: How To Clear The Print Area In Excel
How do I quickly clear the print area?
To clear the print area using a keyboard shortcut, press Ctrl + P to open the Print dialog box, then press Esc to clear the print area.
Can I print specific rows and columns only?
Yes, you can select specific rows and columns to print by highlighting them before going to the Print dialog box. Alternatively, use the “Print Selection” option in the Print dialog box.
How do I print hidden rows and columns?
To print hidden rows and columns, you need to unhide them before printing. Select the rows or columns, right-click and choose “Unhide”. Alternatively, go to the Home tab, click “Find & Select”, and choose “Unhide”.


