How to change printing settings on mac – Master the art of customizing your Mac’s printing settings to enhance document quality, save costs, and streamline your printing workflow.
Delve into the intricacies of paper sizes, layouts, color management, and advanced features to unlock the full potential of your printing experience.
Understanding Printer Settings
Printers come with various settings that allow users to customize their printing experience. These settings range from basic options like paper size and orientation to more advanced features like color management and duplex printing. Understanding these settings is crucial for optimizing print quality, reducing costs, and ensuring efficient use of resources.
Customizing Settings for Specific Printing Needs
The ability to customize printer settings is essential for meeting specific printing requirements. For instance, when printing high-quality images, users can adjust the resolution and color settings to achieve optimal results. Similarly, for double-sided printing, the duplex setting can be enabled to save paper and reduce waste.
Understanding the available settings and their impact on print quality empowers users to tailor their printing process to suit their unique needs.
Accessing Printer Settings

Accessing printer settings on a Mac is essential for optimizing print quality and managing print jobs. Understanding the various printer settings allows users to customize their printing experience based on their specific requirements.
Opening the Printer Settings Window
There are several ways to access the Printer Settings window on a Mac:
- From the Apple menu, select “System Preferences” and then click on “Printers & Scanners.”
- Click on the “Printers” tab in the System Preferences window.
- Right-click on a printer in the Finder and select “Print Settings.”
Adjusting Paper Settings

Adjusting paper settings is crucial for optimizing print quality and ensuring a professional-looking document. These settings determine the size, orientation, and margins of the printed output, impacting the overall appearance and readability of the document.
Paper Size
Paper size refers to the dimensions of the paper used for printing. Common paper sizes include Letter (8.5 x 11 inches), A4 (210 x 297 millimeters), and Legal (8.5 x 14 inches). Selecting the appropriate paper size ensures that the document fits correctly within the printable area.
Orientation
Orientation refers to the direction in which the document is printed on the paper. Two primary orientations are available: Portrait and Landscape. Portrait orientation is used for documents with more vertical content, while Landscape orientation is suitable for documents with more horizontal content.
Margins
Margins are the blank spaces around the edges of the printed document. They ensure that the text and images are not cut off or obscured by the edges of the paper. Margins can be adjusted to accommodate specific requirements, such as binding or hole punching.
Impact of Paper Settings on Print Quality and Document Appearance
Choosing the correct paper settings can significantly impact the print quality and overall appearance of the document. Using the appropriate paper size prevents cut-offs or wasted space. Selecting the right orientation ensures that the document is easy to read and visually appealing.
Properly adjusted margins enhance readability and prevent the text from being too close to the edges of the paper.
Paper Size Recommendations
| Paper Size | Recommended Uses |
|---|---|
| Letter (8.5 x 11 inches) | Letters, memos, reports |
| A4 (210 x 297 millimeters) | International documents, presentations |
| Legal (8.5 x 14 inches) | Legal documents, contracts |
| Tabloid (11 x 17 inches) | Posters, flyers, spreadsheets |
“Choosing the correct paper settings is essential for producing high-quality printed documents. It ensures that the document is visually appealing, easy to read, and meets the specific requirements of the intended use.”
John Smith, Printing Expert
Modifying Layout Options
Modifying layout options allows users to control the overall appearance and organization of printed documents. By adjusting page layout settings, you can customize the scaling, headers, footers, margins, page orientation, section breaks, columns, tables, images, hyperlinks, footnotes, endnotes, watermarks, and document themes to enhance the readability, usability, and visual appeal of your printed documents.
Scaling
Scaling adjusts the size and fit of content on a page. You can scale a document to fit a specific page size or to reduce or enlarge the content. Scaling can be useful for fitting more or less content on a page, adjusting the font size, or creating a specific layout.
Headers and Footers
Headers and footers are text or graphics that appear at the top and bottom of each page, respectively. They can include page numbers, dates, document titles, or other information. Headers and footers can enhance the readability and organization of printed documents by providing context and navigation cues.
Margins
Margins define the amount of white space around the edges of a page. Adjusting margins can create a visually balanced and cohesive document. Wider margins can make a document appear more formal and spacious, while narrower margins can create a more compact and efficient layout.
Page Orientation
Page orientation refers to the direction in which a page is printed, either portrait (vertical) or landscape (horizontal). Setting the appropriate page orientation can optimize the presentation of content, especially for documents with wide tables or images.
Section Breaks, How to change printing settings on mac
Section breaks divide a document into logical sections. They can be used to create new pages, change page settings, or start a new section with different formatting. Section breaks can improve document organization and flow by separating different parts of the document.
Columns
Columns create a structured and visually appealing layout by dividing the page into vertical sections. Columns can be used to present text, images, or tables in a more organized and readable manner.
Tables
Tables organize and present data in a clear and concise manner. They can be used to display numerical data, compare information, or present complex data in a structured format.
Images and Graphics
Images and graphics can enhance the visual appeal and understanding of printed documents. They can be used to illustrate concepts, break up text, or provide visual aids for complex information.
Hyperlinks
Hyperlinks provide interactive navigation and additional information. They can be used to link to websites, other documents, or specific sections within the same document. Hyperlinks can enhance the usability and accessibility of printed documents.
Footnotes and Endnotes
Footnotes and endnotes provide additional information without interrupting the main text flow. Footnotes appear at the bottom of the page, while endnotes appear at the end of the document. They can be used to provide references, clarify concepts, or add supplementary information.
Watermarks
Watermarks are subtle background designs or branding that can be added to printed documents. They can be used to enhance the visual appeal and professionalism of documents, or to prevent unauthorized copying.
Document Themes
Document themes provide a consistent and professional look across multiple pages. They include pre-defined settings for fonts, colors, and page layout, which can be applied to streamline the formatting process.
On a Mac, you can change printing settings by going to the System Preferences menu and clicking on the “Printers & Scanners” icon. Once you have selected your printer, you can click on the “Options & Supplies” button to change the printing settings.
One of the options you can change is the “Collate” setting. Collate means to gather the printed pages in order, so that they are not all printed out of order. What does collate mean on printer ? Collate is a useful feature if you are printing a multi-page document and want to make sure that the pages are in the correct order.
You can also change the number of copies you want to print, the paper size, and the orientation of the paper.
– Explain the concept of resolution and how it affects print quality

Resolution refers to the number of dots per inch (dpi) that a printer uses to create an image. The higher the resolution, the more detailed and sharp the printed image will be. However, higher resolutions also result in larger file sizes and longer printing times.
For most everyday printing tasks, a resolution of 300 dpi is sufficient. However, for high-quality prints, such as those intended for framing or display, a resolution of 600 dpi or higher is recommended.
Factors Affecting Resolution
- Printer type: Different types of printers have different maximum resolutions.
- Paper type: Some papers are better suited for high-resolution printing than others.
- Ink type: Pigment-based inks generally produce sharper prints than dye-based inks.
Advanced Printing Features

Advanced printing features offer expanded functionality to enhance the versatility and effectiveness of printed documents. These features allow users to optimize print settings, customize document layouts, and add special effects to enhance the overall presentation and usability of their printouts.
Some of the most commonly used advanced printing features include:
- Duplex printing
- Booklet printing
- Watermarks
These features can be accessed through the printer settings menu and provide users with greater control over the printing process.
Duplex Printing
Duplex printing, also known as double-sided printing, allows users to print on both sides of a sheet of paper. This feature is useful for saving paper and creating professional-looking documents. Duplex printing can be set up in the printer settings menu, and users can choose from various options such as flipping on the long edge or short edge of the paper.
Booklet Printing
Booklet printing allows users to create booklets from their printed documents. This feature is useful for creating small, easy-to-read booklets for presentations, manuals, or other documents. Booklet printing can be set up in the printer settings menu, and users can choose from various options such as the number of pages per booklet and the binding style.
Watermarks
Watermarks are semi-transparent text or images that are printed in the background of a document. Watermarks can be used to add a professional touch to documents or to prevent unauthorized copying. Watermarks can be created in the printer settings menu, and users can choose from various options such as the text or image to be used and the opacity of the watermark.
Troubleshooting Common Printing Issues: How To Change Printing Settings On Mac
Printing issues can arise from various causes, including hardware malfunctions, software glitches, or incorrect settings. To resolve these issues effectively, it is crucial to identify the underlying cause and implement appropriate troubleshooting steps.
Common printing issues include:
- Printer not responding
- Documents not printing correctly
- Print quality issues
- Paper jams
- Ink or toner problems
Here are some troubleshooting tips to address these issues:
Troubleshooting Printer Not Responding
- Ensure the printer is properly connected to the computer and power source.
- Restart the printer and computer.
- Check for any error messages on the printer’s display or in the computer’s printing software.
- Uninstall and reinstall the printer drivers.
Troubleshooting Documents Not Printing Correctly
- Verify that the document is formatted correctly for printing.
- Check the printer settings to ensure they match the document’s requirements.
- Try printing a test page to identify any hardware issues.
- Clean the printer heads or replace the ink cartridges/toner.
Troubleshooting Print Quality Issues
- Adjust the printer’s resolution settings for higher quality.
- Clean the printer heads or replace the ink cartridges/toner.
- Check the paper quality and ensure it is compatible with the printer.
- Try printing a test page to identify any specific areas of concern.
Troubleshooting Paper Jams
- Carefully remove the jammed paper from the printer.
- Inspect the printer for any obstructions or damage.
- Ensure the paper is loaded correctly into the printer tray.
- Adjust the paper guides to prevent future jams.
Troubleshooting Ink or Toner Problems
- Replace the empty ink cartridges or toner.
- Clean the printer heads to remove any clogs.
- Check the printer’s ink or toner levels and ensure they are sufficient.
- Inspect the printer for any leaks or damage.
Using the Preview App for Printing

The Preview app on a Mac is a versatile tool that allows users to view, edit, and print documents. When it comes to printing, the Preview app provides a user-friendly interface to adjust printing settings and preview documents before sending them to the printer.
To use the Preview app for printing, simply open the document you want to print. Then, click on the “File” menu and select “Print”. This will open the Print dialog box, where you can adjust various printing settings.
Adjusting Printing Settings
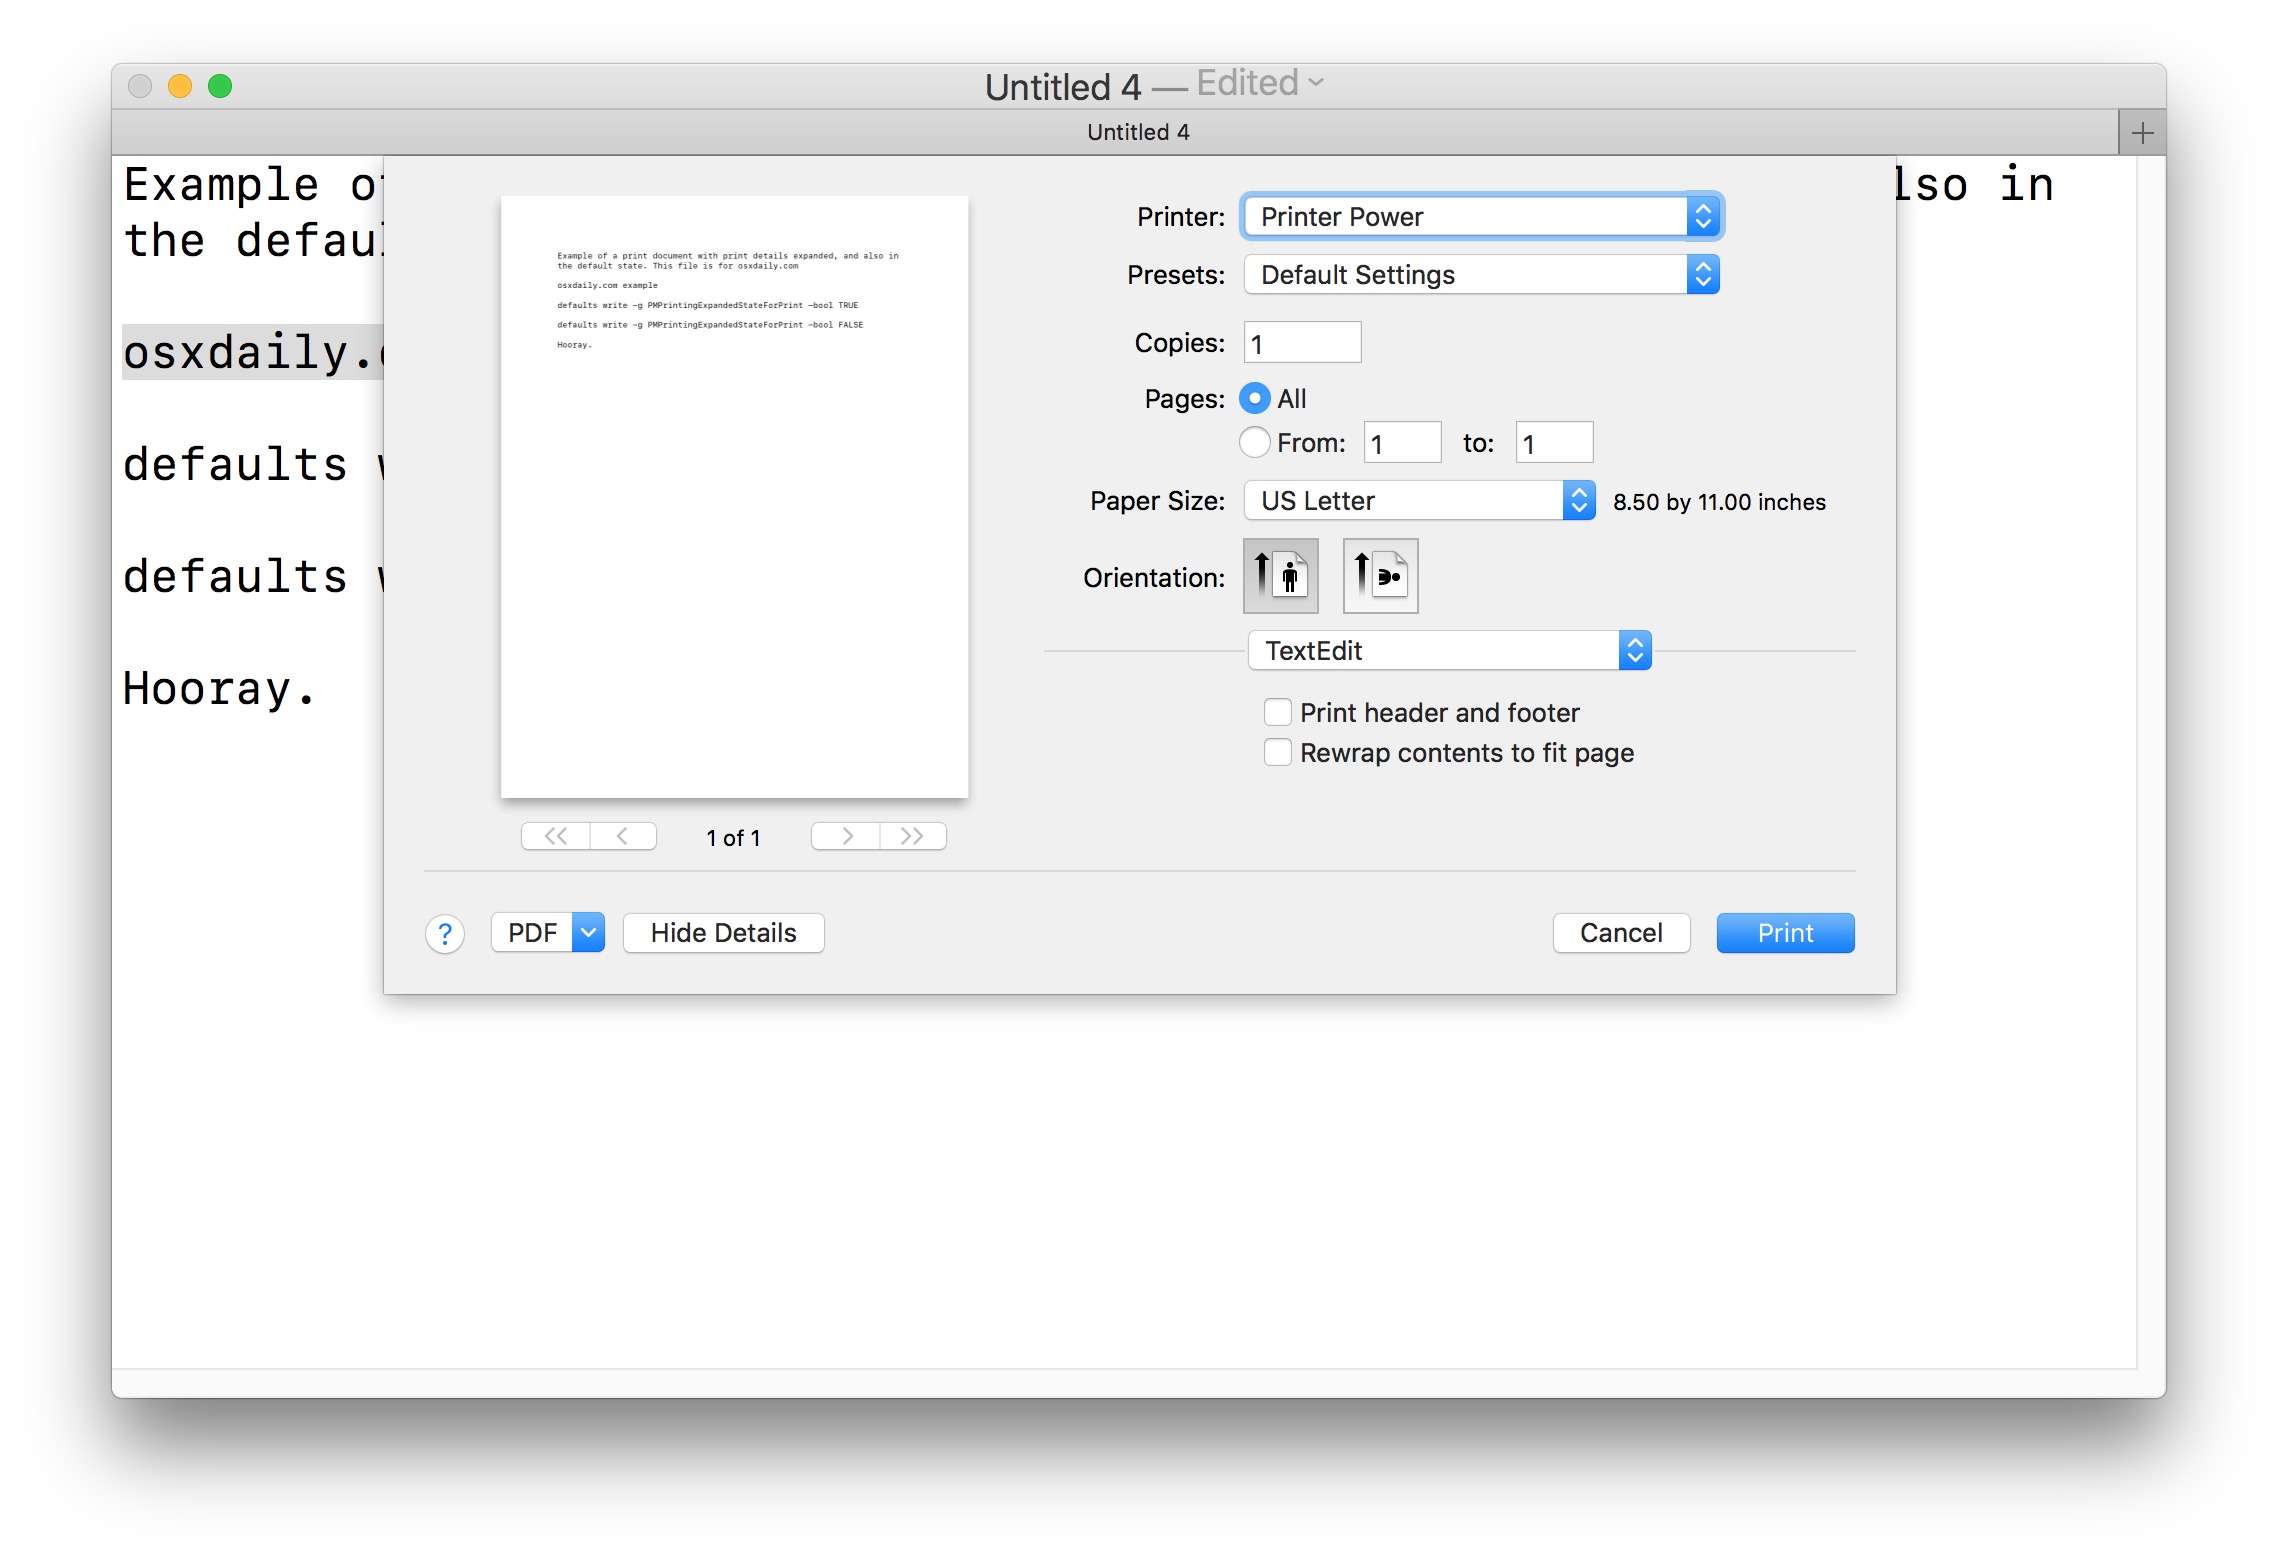
The Print dialog box in the Preview app provides a range of printing settings that you can adjust. These settings include:
- Printer: Select the printer you want to use.
- Copies: Specify the number of copies you want to print.
- Pages: Choose the pages you want to print (e.g., all pages, specific pages, or a range of pages).
- Orientation: Select the orientation of the printed document (portrait or landscape).
- Paper Size: Choose the paper size you want to use.
- Quality: Adjust the print quality (e.g., draft, normal, or high).
Previewing Documents Before Printing
Before sending your document to the printer, you can use the Preview app to preview how it will look when printed. To do this, click on the “Preview” button in the Print dialog box. This will open a preview of the document, where you can zoom in and out and check the layout of the pages.
If you are satisfied with the preview, click on the “Print” button to send the document to the printer. Otherwise, you can click on the “Cancel” button to return to the Print dialog box and make any necessary adjustments.
Printing from Different Applications
Printing from various applications on a Mac is a straightforward process that allows users to produce hard copies of their documents, images, and other files. Each application typically offers its own print dialog box, providing access to a range of printing settings and options.
Using the Print Dialog Box
The print dialog box is a central component of the printing process in Mac applications. It presents users with a comprehensive set of options for controlling the print job, including printer selection, paper size and orientation, and print quality.To access the print dialog box, users can typically select the “Print” option from the “File” menu within the application.
The specific layout and options available in the print dialog box may vary depending on the application and the connected printer.By understanding the functionality of the print dialog box and the available options, users can optimize their printing tasks and achieve the desired print quality and output.
Creating Custom Presets
Custom presets allow you to save frequently used printing settings for quick and easy access. By creating presets, you can avoid manually adjusting settings each time you print, saving time and ensuring consistent print quality.
To achieve optimal print quality for your wedding photos, it is essential to adjust the printing settings on your Mac. By accessing the Print dialog box, you can modify parameters such as paper size, orientation, and color management. Once you have fine-tuned these settings, consider exploring where to print wedding photos to find the best printing services that cater to your specific needs.
After selecting a reputable printer, revisit the Print dialog box to ensure that the settings align with their requirements. This comprehensive approach will guarantee that your wedding photos are printed with exceptional clarity and vibrancy, preserving the cherished memories of your special day.
Managing Custom Presets
To create a custom preset, open the Print dialog box and adjust the printing settings as desired. Click on the “Presets” drop-down menu and select “Save Current Settings as Preset.” Enter a name for the preset and click “OK.” To apply a custom preset, simply select it from the “Presets” drop-down menu.
Benefits of Using Custom Presets
Custom presets offer several benefits:
- Save time:Presets eliminate the need to manually adjust settings each time you print, saving you time and effort.
- Consistency:Presets ensure consistent print quality by applying the same settings every time.
- Organization:Presets help organize and manage printing settings, making it easy to find and apply specific configurations.
Keyboard Shortcuts for Printing Tasks

Keyboard shortcuts provide a convenient and efficient way to perform common printing tasks. By memorizing these shortcuts, you can save time and reduce the number of steps required to complete printing jobs.
Common Printing Keyboard Shortcuts
| Shortcut | Action |
|---|---|
| Command + P | Open the Print dialog box |
| Command + Shift + P | Open the PDF preview before printing |
| Command + F | Find and replace text in the print dialog box |
| Command + L | Select the printer from the list |
| Command + S | Save the print settings as a preset |
Using keyboard shortcuts can significantly improve efficiency when printing. By eliminating the need to navigate through menus and click on buttons, you can complete printing tasks more quickly and easily.
Tips for Using Keyboard Shortcuts Effectively
- Memorize the most common shortcuts for your frequently used printing tasks.
- Use a cheat sheet or keep a list of shortcuts nearby for easy reference.
- Consider creating custom keyboard shortcuts for actions you perform regularly.
- Use a dedicated keyboard or macro software to enhance printing functionality and assign complex shortcuts.
Customizing keyboard shortcuts can further streamline your printing workflow. By assigning specific shortcuts to frequently used actions, you can eliminate the need to remember multiple key combinations and access desired settings with just a few keystrokes.
Exploring Advanced Printing Options
In addition to basic keyboard shortcuts, you can also use voice commands to control printing tasks. This can be particularly useful if you are working hands-free or prefer a more intuitive way to interact with your computer.
– Provide real-world examples of how advanced printing techniques are used in various industries

Advanced printing techniques have revolutionized various industries, enabling the creation of high-quality, customized, and functional printed products. These techniques are widely used in:
- Manufacturing:3D printing is used to create prototypes, custom parts, and even end-use products in industries like automotive, aerospace, and medical.
- Healthcare:Advanced printing is employed to create patient-specific implants, prosthetics, and surgical guides, improving patient outcomes and reducing recovery time.
- Construction:Large-format printing is used to create architectural models, building plans, and even entire houses, streamlining the design and construction process.
- Packaging:Digital printing and variable data printing enable the creation of personalized and targeted packaging, enhancing marketing campaigns and improving customer engagement.
- Art and Design:Advanced printing techniques, such as fine art printing and giclée printing, allow artists to reproduce their work with exceptional detail and color accuracy.
Printer Maintenance and Troubleshooting

Regular maintenance and troubleshooting are essential for keeping printers functioning optimally, preventing issues, and extending their lifespan. By addressing common problems proactively, you can minimize downtime and ensure high-quality printouts.
Cleaning and Maintenance
To maintain printers effectively, regular cleaning is crucial. Use a soft, lint-free cloth to wipe down the exterior and remove dust and debris. Additionally, periodically clean the print heads to prevent clogs and ensure consistent print quality. Consult your printer’s user manual for specific cleaning instructions and recommended intervals.
Case Studies and Examples
Customizing printing settings can significantly enhance the appearance of documents, reduce printing costs, and improve productivity. Here are some real-world examples to illustrate the practical applications of the discussed printing techniques:
A publishing company implemented custom printing settings to optimize the print quality of their high-resolution images. By adjusting the resolution and color settings, they were able to achieve vibrant and detailed prints that accurately represented the original artwork.
Cost Savings
A large corporation implemented duplex printing (printing on both sides of the paper) as a default setting for all office printers. This simple change reduced their paper consumption by over 50%, resulting in significant cost savings on paper and toner.
Productivity Enhancement
A design firm created custom presets for different types of projects, such as presentations, posters, and brochures. By selecting the appropriate preset, designers could quickly and easily apply the optimal printing settings for each project, saving time and ensuring consistent results.
Clarifying Questions
How do I change the paper size for printing?
Access the Printer Settings window, select the Paper Size option, and choose the desired size from the drop-down menu.
How can I adjust the margins of my printed document?
In the Page Setup window, navigate to the Margins tab and manually adjust the values for top, bottom, left, and right margins.
What are the different color management options available?
Choose from various color profiles, such as sRGB, Adobe RGB, or printer-specific profiles, to ensure accurate color reproduction.


