Delving into the realm of printing, understanding how to change default printer settings is a fundamental skill that can significantly enhance your printing experience. Whether you’re looking to optimize print quality, manage printer queues, or troubleshoot common issues, this comprehensive guide will empower you with the knowledge and techniques to master your printing endeavors.
Navigating the intricacies of printer settings can be daunting, but fear not! This guide will unravel the complexities, providing clear and concise instructions to guide you through each step of the process. From identifying the default printer to customizing print options, setting paper size and orientation, and resolving common printer issues, we’ve got you covered.
Identifying the Default Printer
Locating the default printer is a crucial step when managing printing tasks. The default printer is the printer that is automatically selected for printing documents unless you specify a different printer.
Windows Operating System
- Go to the Control Panel.
- Click on “Devices and Printers”.
- The default printer will have a green checkmark next to it.
macOS
- Go to the Apple menu.
- Select “System Preferences”.
- Click on “Printers & Scanners”.
- The default printer will be listed at the top of the list.
Significance of Default Printer Setting
Setting a default printer simplifies the printing process by eliminating the need to manually select a printer each time you want to print. It ensures that your documents are printed on the intended printer without any hassle.
Accessing Printer Settings

Accessing printer settings allows you to configure and manage your printer’s behavior, including print quality, paper size, and default print options. The steps to access printer settings vary depending on the operating system you are using.
Here’s how to access printer settings on different operating systems:
Windows
- Go to the Control Panel.
- Click on “Hardware and Sound.”
- Select “Devices and Printers.”
macOS
- Go to the Apple menu.
- Select “System Preferences.”
- Click on “Printers & Scanners.”
Linux
- Open the Settings app.
- Search for “Printers.”
- Click on the “Printers” option.
Once you have accessed the printer settings panel, you can configure various options, such as:
- Default printer selection
- Print quality
- Paper size
- Orientation
- Duplex printing
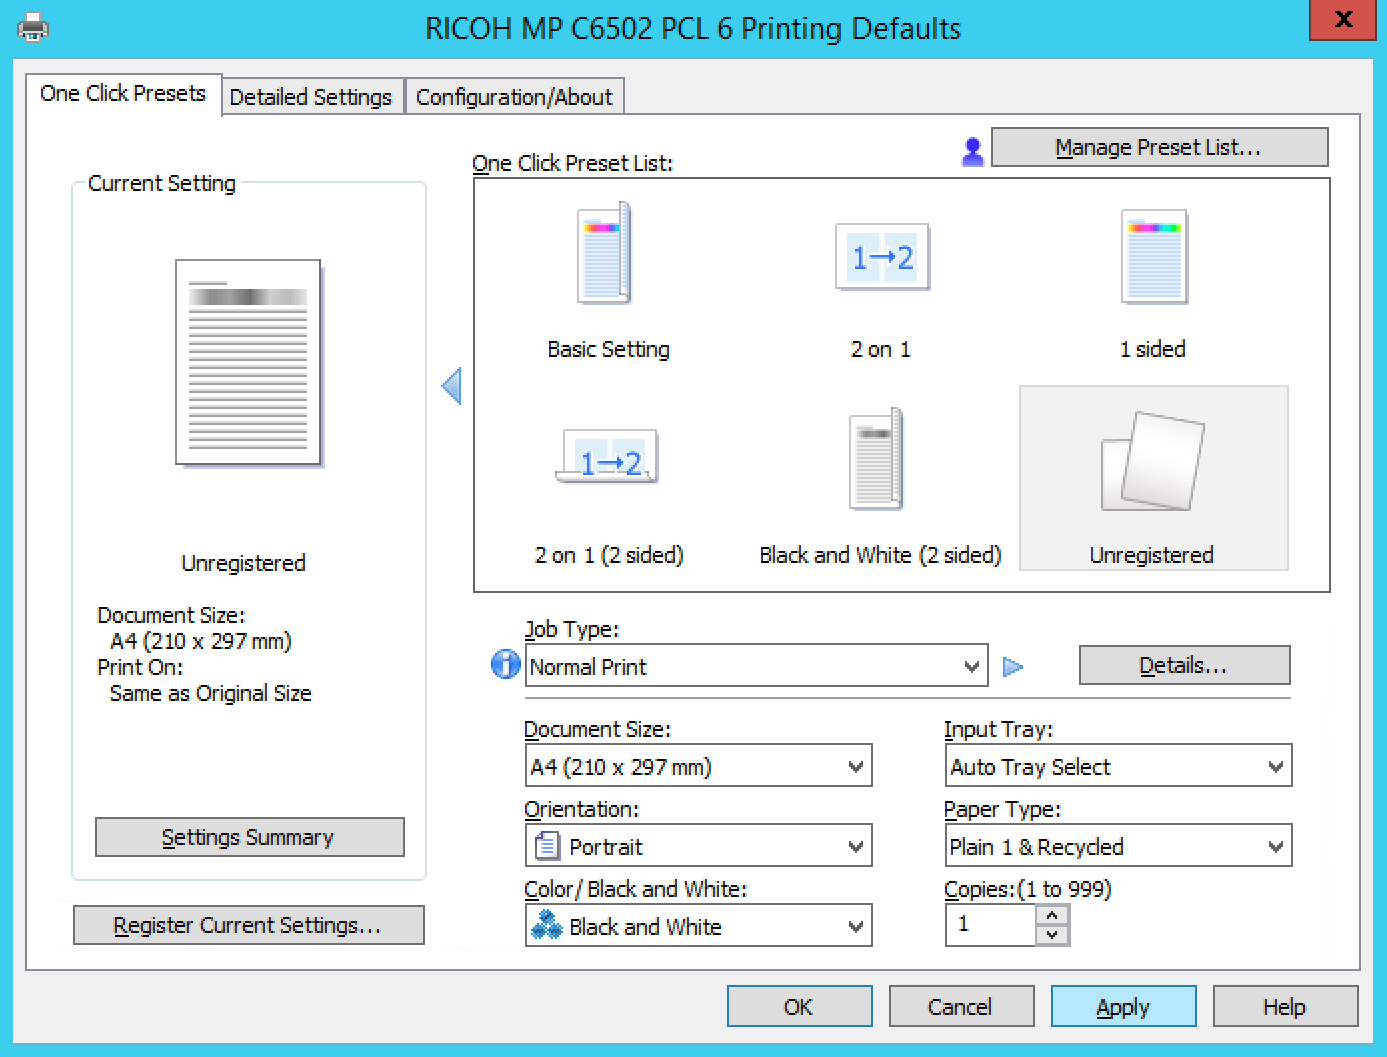
Customizing Print Options
Customizing print options allows you to optimize the quality and efficiency of your printouts. Various settings are available, including paper size, orientation, number of copies, and print quality.
Paper Size and Orientation
Paper size refers to the physical dimensions of the paper used for printing. Common paper sizes include A4, letter, and legal. Orientation refers to the alignment of the printed content on the paper, either portrait (vertical) or landscape (horizontal).
Number of Copies, How to change default printer settings
This setting specifies the number of copies to be printed. You can choose to print single or multiple copies of the document.
Print Quality
Print quality refers to the sharpness and clarity of the printed text and images. Higher print quality settings typically result in better-looking prints but may take longer to print.
Troubleshooting Print Quality Issues
If you encounter issues with print quality, adjusting the print options can help resolve them. For example, if the print is too light, you can increase the print quality setting. If the print is blurry, you can try using a higher paper size or a different paper type.
Setting Default Paper Size and Orientation
When printing documents, it is important to select the correct paper size and orientation to ensure that the document is printed correctly. The default paper size and orientation can be set in the printer settings.
There are a variety of paper sizes available, including Letter, A4, Legal, and Tabloid. The most common paper size is Letter, which is used for standard business correspondence and legal documents. A4 is the international standard paper size, and it is used in most of Europe and Asia.
Legal paper is used for legal documents and contracts, and Tabloid paper is used for newspapers and posters.
The orientation of the paper can be either portrait or landscape. Portrait orientation is the default orientation, and it is used for most documents. Landscape orientation is used for documents that are wider than they are tall, such as spreadsheets and presentations.
To change the default paper size and orientation, follow these steps:
- Open the Control Panel.
- Click on the “Printers and Faxes” icon.
- Right-click on the printer that you want to change the settings for.
- Click on the “Properties” option.
- Click on the “Paper” tab.
- Select the desired paper size from the “Paper Size” drop-down menu.
- Select the desired orientation from the “Orientation” drop-down menu.
- Click on the “OK” button.
The default paper size and orientation will now be changed for the selected printer.
Example Table of Common Paper Sizes and Uses
The following table provides a summary of the most common paper sizes and their uses:
| Paper Size | Use |
|---|---|
| Letter | Standard business correspondence, legal documents |
| A4 | International standard paper size, used in most of Europe and Asia |
| Legal | Legal documents, contracts |
| Tabloid | Newspapers, posters |
Example Code Snippet for Setting Default Paper Size and Orientation
The following code snippet demonstrates how to programmatically set the default paper size and orientation:
import com.itextpdf.text.PageSize;
import com.itextpdf.text.Rectangle;

public class SetDefaultPaperSizeAndOrientation

    public static void main(String[] args)
        // Create a new document with a default page size of A4
        Document document = new Document(PageSize.A4);

        // Set the default page size to Letter
        document.setPageSize(PageSize.LETTER);

        // Set the default page orientation to landscape
        document.setPageSize(PageSize.LETTER.rotate());
– Explain the different print quality settings (e.g., draft, normal, high).
Print quality settings determine the sharpness, detail, and overall appearance of printed documents. Different settings are available, each optimized for specific purposes. Understanding these settings helps you select the most appropriate one for your printing needs.
Draft
Draft mode prioritizes speed over quality, producing a lower-resolution print with less detail. It is suitable for quick printing of non-critical documents, such as drafts or internal memos.
Normal
Normal mode balances speed and quality, providing a good balance of resolution and detail. It is suitable for general-purpose printing, such as letters, reports, and presentations.
High
High mode emphasizes quality over speed, producing high-resolution prints with sharp details and vibrant colors. It is suitable for important documents, photographs, and other prints where precision is crucial.
Custom
Some printers offer custom settings that allow you to fine-tune print quality parameters, such as resolution, color depth, and dithering. This option provides greater control over the printing process, enabling you to optimize settings for specific document types or printing materials.
Troubleshooting Print Quality Issues
If you encounter print quality issues, such as blurry prints, faded colors, or banding, try the following troubleshooting tips:
- Check the printer ink levels and replace empty cartridges.
- Clean the printer nozzles to remove any clogs.
- Select the appropriate print quality setting for your document.
- Use high-quality paper designed for printing.
- Update your printer drivers to ensure compatibility with your operating system.
Additional Resources
For more information on print quality settings, refer to the following resources:
- HP Support: Print Quality Troubleshooting
- Brother Support: Print Quality Guide
- Epson Support: Understanding Print Quality Settings
Managing Printer Queues
Effectively managing printer queues is crucial for maintaining a smooth and efficient printing workflow. It allows users to monitor, control, and troubleshoot print jobs, ensuring optimal performance and timely completion.
To view the print queue, navigate to the operating system’s printing settings. Here, users can view a list of all active and pending print jobs. The print queue can be sorted and filtered by various criteria, such as job name, status, or submission time.
Pausing and Resuming Print Jobs
Pausing print jobs allows users to temporarily stop the printing process, freeing up the printer for other tasks. Individual print jobs or the entire print queue can be paused, providing flexibility and control over the printing process.
Resuming print jobs allows users to continue printing after a pause, ensuring that jobs are not lost or forgotten. This is particularly useful when dealing with large or complex print jobs that may require interruptions.
Canceling Print Jobs
Canceling print jobs is necessary when a job is no longer required or has encountered an error. Individual print jobs or the entire print queue can be canceled, freeing up printer resources and preventing unnecessary printing.
However, it’s important to note that canceling a print job may result in lost data or wasted materials, so it should be done judiciously.
By modifying the default printer settings, users can tailor their printing preferences. One such setting is the ‘Collate’ option, which determines whether multiple copies of a document are printed sequentially or as complete sets. To learn more about the concept of collation in printing, refer to the informative article: what is collate in printing.
By understanding this feature, users can customize their printing settings to suit their specific needs, ensuring efficient and organized document production.
Troubleshooting Printer Queue Issues
Common printer queue issues include communication errors between the computer and printer, insufficient memory or resources, and driver conflicts. Resolving these issues may involve restarting the print spooler service, updating printer drivers, or checking for hardware issues.
Various tools are available for troubleshooting printer queue issues, including the operating system’s built-in troubleshooting wizards, manufacturer-specific diagnostic tools, and third-party software.
Troubleshooting Common Printer Issues
Printers, like any other electronic device, can experience various issues that can hinder their performance. These issues can range from minor annoyances to major problems that require professional assistance. However, many common printer issues can be easily resolved with a few simple troubleshooting steps.
Identifying and resolving common printer issues can save time and frustration, ensuring that your printer operates smoothly and efficiently. This section will explore some of the most frequent printer problems and provide step-by-step guides to help you troubleshoot and resolve them.
Paper Jams
Paper jams are one of the most common printer issues. They occur when paper becomes stuck inside the printer, preventing it from feeding correctly. Paper jams can be caused by various factors, such as using the wrong type of paper, loading the paper incorrectly, or having a damaged printer.
- Check the paper tray:Ensure that the paper is loaded correctly, with the edges aligned and the correct orientation.
- Remove any jammed paper:Gently pull out any visible jammed paper from the printer’s input or output tray.
- Inspect the printer rollers:Check for any debris or damage on the printer’s rollers. Clean the rollers with a soft cloth or compressed air if necessary.
- Restart the printer:Turn off the printer, wait a few minutes, and then turn it back on. This can reset the printer and clear any temporary errors.
- Try a different type of paper:If the problem persists, try using a different type of paper that is compatible with your printer.
Creating Custom Printer Profiles
Creating custom printer profiles can significantly enhance your printing experience by tailoring print settings to specific printing needs. It allows for precise control over various print parameters, ensuring optimal results for different types of documents, media, and print quality requirements.
To create a custom printer profile, follow these steps:
Accessing Printer Settings
- Navigate to the printer settings menu, typically found in the Control Panel or System Preferences (for Mac).
- Locate the “Printers” or “Printers & Scanners” section.
- Select your printer and click on “Properties” or “Preferences.”
Creating a New Profile
- Within the printer settings, look for an option to create or manage printer profiles.
- Click on “New” or “Add” to create a new profile.
- Enter a descriptive name for the profile, indicating its intended purpose (e.g., “High-Quality Photo Printing”).
Customizing Print Options
- Adjust print settings as per your specific requirements, such as:
- Print quality:Choose from draft, normal, or high quality settings, depending on the desired output quality.
- Paper size and orientation:Specify the paper size and orientation for the print job.
- Color mode:Select between grayscale, black and white, or color printing.
- Resolution:Set the print resolution in dots per inch (DPI) for optimal image quality.
Once you have customized the print settings, click “Save” or “Apply” to create the new printer profile.
Managing Printer Profiles
- You can manage existing printer profiles by selecting them from the list and clicking on “Edit” or “Delete” as needed.
- To switch between different printer profiles, simply select the desired profile from the list before starting a print job.
By creating and managing custom printer profiles, you can optimize your printing experience for various printing needs, ensuring consistent and high-quality results for different types of documents and media.
Printing from Different Applications: How To Change Default Printer Settings
Printing documents from different applications requires an understanding of the printing options available in each application. This section discusses printing from commonly used applications such as Microsoft Word, Adobe Photoshop, and web browsers, providing tips for optimizing print settings for different file types and specific document types.
Microsoft Word
Microsoft Word offers a wide range of printing options, including:
- Page Setup:Allows you to specify paper size, orientation, margins, and headers/footers.
- Print Preview:Lets you view the document before printing, allowing you to check for errors or adjust settings.
- Print Quality:Options include Draft, Normal, and High, with higher quality settings using more ink.
- Color Options:Allows you to print in color, grayscale, or black and white.
- Advanced Options:Provides additional settings such as duplex printing, scaling, and paper source.
Example:To print a multi-page Word document with specific page margins and headers, navigate to File > Print, select the desired printer, adjust the Page Setup and Header/Footer settings, and click Print.
Adobe Photoshop
Adobe Photoshop is primarily used for image editing, but it also offers printing options tailored for images:
- Print Size:Allows you to specify the print size, resolution, and units (inches, centimeters).
- Color Management:Provides options to control color accuracy and ensure consistent color reproduction.
- Bleed and Trim Marks:Useful for printing documents that will be trimmed or bound.
- File Handling:Options to specify how the image is handled during printing, such as tiling or scaling.
- Proof Setup:Allows you to create a proof print to check colors and layout before final printing.
Example:To print a high-resolution image with specific color management settings, open the image in Photoshop, go to File > Print, select the desired printer, adjust the Print Size and Color Management settings, and click Print.
When it comes to printing documents, ensuring the correct printer settings are configured is essential. However, if you’re experiencing issues with your prints, you may wonder, does printer ink expire ? While ink degradation over time can affect print quality, adjusting your default printer settings can often resolve common printing problems.
Whether you’re adjusting margins, paper orientation, or print quality, understanding how to change these settings can enhance your printing experience and ensure optimal results.
Web Browsers
Web browsers offer basic printing options, suitable for printing web pages and documents viewed online:
- Page Setup:Allows you to specify paper size, orientation, and margins.
- Print Preview:Lets you view the web page before printing, allowing you to check for errors or adjust settings.
- Print Quality:Typically limited to Draft or Normal quality settings.
- Color Options:Allows you to print in color or black and white.
- Header and Footer:Some browsers allow you to add custom headers and footers to the printout.
Example:To print a web page, open the page in your browser, click on the File menu or press Ctrl+P (Windows) or Command+P (Mac), select the desired printer, adjust the settings as needed, and click Print.
Table Summary of Key Printing Options for Different Applications:
| Application | Key Printing Options |
|---|---|
| Microsoft Word | Page Setup, Print Preview, Print Quality, Color Options, Advanced Options |
| Adobe Photoshop | Print Size, Color Management, Bleed and Trim Marks, File Handling, Proof Setup |
| Web Browsers | Page Setup, Print Preview, Print Quality, Color Options, Header and Footer |
Advanced Printer Settings
:max_bytes(150000):strip_icc()/B3-SetaDefaultPrinterinWindows10-annotated-1bccbb3c19874efe96cd7a0a06f2d97b.jpg)
Advanced printer settings provide additional control over the printing process, allowing users to customize specific aspects of the printed output. These settings include options for duplex printing, borderless printing, and watermarking.
Duplex Printing
Duplex printing, also known as double-sided printing, allows users to print on both sides of the paper, reducing paper usage and saving costs. To access the duplex printing settings, users typically need to navigate to the printer’s driver properties or preferences.
In the duplex printing settings, users can choose from various options, including:
- Flip on Long Edge:Flips the pages on the long edge of the paper.
- Flip on Short Edge:Flips the pages on the short edge of the paper.
- Booklet:Creates a booklet-style document by printing multiple pages on a single sheet and folding it in the middle.
Borderless Printing
Borderless printing allows users to print images and documents without any margins, extending the printed content to the edges of the paper. To access the borderless printing settings, users need to navigate to the printer’s driver properties or preferences.
In the borderless printing settings, users can choose from various options, including:
- Borderless:Prints the document without any margins.
- Reduced Border:Prints the document with minimal margins.
- Custom Margins:Allows users to specify custom margins for the document.
Watermark
Watermark printing allows users to add a transparent image or text over the printed document. Watermarks are often used to identify confidential documents or add branding to printed materials.
To access the watermark settings, users need to navigate to the printer’s driver properties or preferences.
In the watermark settings, users can choose from various options, including:
- Image Watermark:Adds an image as a watermark.
- Text Watermark:Adds text as a watermark.
- Font:Specifies the font for the text watermark.
- Opacity:Controls the transparency of the watermark.
Connecting to a Network Printer
In today’s digital world, the ability to print documents from anywhere is essential. Network printers allow users to connect to a printer over a network, enabling them to print from any device connected to the same network.
There are two main types of network printer connections: Wi-Fi and Ethernet.
Wi-Fi
Wi-Fi is a wireless technology that allows devices to connect to a network without the need for cables. To connect a printer to a Wi-Fi network, you will need to know the network name and password.
- On the printer, navigate to the network settings menu.
- Select the Wi-Fi network you want to connect to.
- Enter the network password.
- Save the settings.
Ethernet
Ethernet is a wired technology that uses cables to connect devices to a network. To connect a printer to an Ethernet network, you will need an Ethernet cable.
- Connect one end of the Ethernet cable to the printer and the other end to an available Ethernet port on your router or switch.
- On the printer, navigate to the network settings menu.
- Select the Ethernet connection type.
- Save the settings.
Sharing a Printer on a Network

Sharing a printer on a network offers several advantages, including:
- Increased efficiency:Multiple users can access and use the same printer without having to physically move it or connect their devices individually.
- Reduced costs:Businesses and organizations can save money by sharing a single printer rather than purchasing multiple devices for different workstations.
- Enhanced flexibility:Users can print from any networked device, regardless of their location or proximity to the printer.
Setting Up Printer Sharing
The steps involved in setting up printer sharing vary depending on the operating system and network configuration. However, the general process typically involves:
- Enabling printer sharing:On the computer connected to the printer, enable printer sharing in the printer settings.
- Configuring network settings:Ensure that all computers on the network are connected to the same network and have the necessary permissions to access shared resources.
- Sharing the printer:Share the printer from the computer connected to it, making it available to other devices on the network.
- Connecting to the shared printer:On other computers on the network, add the shared printer by following the instructions for adding a network printer.
Using Printer Utilities
Functionality of Printer Utilities
Printer utilities are software programs provided by printer manufacturers that allow users to manage and monitor their printers remotely. These utilities typically offer a range of features, including:
- Remote printing, scanning, and copying
- Printer status monitoring
- Ink level tracking
- Cloud storage integration
- Document management
Examples of Printer Utilities
Some popular printer utilities include:
- HP Smart
- Epson Connect
- Brother iPrint&Scan
Comparison of Printer Utility Features
The following table compares the features of different printer utilities:| Printer Utility | Features ||—|—|| HP Smart | Remote printing, scanning, and copying; printer status monitoring; ink level tracking || Epson Connect | Remote printing, scanning, and copying; printer status monitoring; ink level tracking; cloud storage integration || Brother iPrint&Scan | Remote printing, scanning, and copying; printer status monitoring; ink level tracking; document management |
Troubleshooting Printer Problems Using Printer Utilities
Printer utilities can also be used to troubleshoot common printer problems. Here are some steps on how to do this:
- Check the printer status using the printer utility.
- If the printer is offline, check the connection between the printer and the computer.
- If the printer is out of ink, replace the ink cartridges.
- If the printer is experiencing a paper jam, clear the paper jam.
- If the printer is not printing correctly, clean the print heads.
Maintaining Printers
:max_bytes(150000):strip_icc()/setasdefault2annotated-b226fd97bae8453e98cc08eb30ba43a4.jpg "Printer default set windows setup printers computerhope issues")
Regular printer maintenance is essential for ensuring optimal performance, extending its lifespan, and preventing costly repairs. Neglecting printer maintenance can lead to diminished print quality, paper jams, and other issues that can disrupt workflow and productivity.
To maintain printers effectively, it’s crucial to follow these tips:
Cleaning
- Cleaning Print Heads:Clogged print heads can cause blurry or faded prints. Use the printer’s built-in cleaning utility or manually clean the print heads with a lint-free cloth and isopropyl alcohol.
- Removing Paper Dust:Paper dust accumulation inside the printer can lead to paper jams. Regularly vacuum or blow out dust from the paper tray, rollers, and other internal components.
- Cleaning External Surfaces:Wipe down the printer’s exterior with a damp cloth to remove dust and debris. Avoid using harsh chemicals or abrasive cleaners.
Maintenance
- Checking Ink/Toner Levels:Monitor ink or toner levels and replace cartridges when necessary to avoid printouts with missing or faded colors.
- Lubricating Moving Parts:Apply a small amount of printer-specific lubricant to moving parts, such as rollers and gears, to ensure smooth operation and reduce wear.
- Firmware Updates:Regularly check for and install firmware updates from the manufacturer’s website. These updates can improve printer performance and address any known issues.
- Scheduled Servicing:For heavy-duty printers, consider scheduling regular servicing by a qualified technician to perform a thorough inspection, cleaning, and any necessary repairs.
Upgrading Printer Drivers
Keeping printer drivers up to date is crucial for maintaining optimal printer performance and functionality. Outdated drivers can lead to compatibility issues, reduced print quality, and other problems. Regular updates address these issues and enhance printer capabilities.
Checking for and Installing Printer Driver Updates
To check for driver updates, visit the manufacturer’s website or use the Windows Update utility. The manufacturer’s website will typically have a dedicated section for driver downloads. Windows Update can automatically detect and install updates for your printer driver, but it may not always provide the latest version.
Steps for Updating Printer Drivers
- Identify your printer model and operating system.
- Visit the manufacturer’s website or use Windows Update.
- Download the latest driver package.
- Run the installation wizard and follow the on-screen instructions.
- Restart your computer to complete the update.
Troubleshooting Common Issues
* Driver Not Found:Ensure you have selected the correct printer model and operating system.
Installation Error
Close all open programs and restart your computer before attempting to install the driver again.
Printer Not Recognized
Disconnect and reconnect the printer to your computer. Check the printer’s USB cable or network connection.
Automating Printer Driver Updates
A script can automate the process of updating printer drivers. Here’s a simple Python script:“`pythonimport os# Get printer nameprinter_name = input(“Enter printer name: “)# Download driveros.system(“wget https://example.com/drivers/printer_driver.exe”)# Install driveros.system(“msiexec /i printer_driver.exe /quiet”)# Restart computeros.system(“shutdown
- r
- t 0″)
“`
Top FAQs
How do I identify the default printer on my computer?
To identify the default printer on your computer, follow these steps:
- Go to the Control Panel (Windows) or System Preferences (Mac).
- Locate the Printers or Printers & Scanners section.
- The default printer will be marked as “Default” or have a checkmark next to it.
How can I change the default paper size for my printer?
To change the default paper size for your printer:
- Open the printer settings panel on your computer.
- Locate the “Paper Size” or “Page Setup” options.
- Select the desired paper size from the available options.
- Click “OK” or “Apply” to save the changes.
What are some common print quality issues and how can I resolve them?
Some common print quality issues include:
- Faded or faint prints:Replace the ink cartridges or toner.
- Streaks or smudges:Clean the print heads.
- Blurry or distorted prints:Check the paper quality and printer settings.
- Paper jams:Remove the jammed paper and ensure the paper tray is properly loaded.


